
Gradient List Control Overview
The Fractal Science Kit fractal generator Gradient List Control is found on Classic Controllers, Orbit Trap Controllers, and Orbital Controllers. It maintains an ordered list of Gradients available to the controller. Note that some color controllers do not use gradients and this list may be empty.
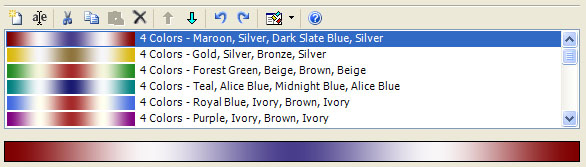
The Gradient List Control is divided into 2 panes, the list pane and the preview pane. The list pane (the top pane) contains the ordered list of gradients. The preview pane (the bottom pane) contains a preview for the currently selected gradient. If the list selection is empty or contains more than 1 item, the preview pane is empty.
The Gradient List Control has 2 main functions. First, it is used to maintain the list of gradients. This includes adding gradients to the list, deleting gradients from the list, renaming gradients in the list, and moving gradients up/down in the list. These operations are performed by selecting 1 or more gradients in the list pane and executing one of the list editor commands. For example, to remove gradients from your list you would select the gradients to remove in the list pane and execute the Delete command.
The second function of the Gradient List Control is to preview a gradient. To edit a gradient, simply click on the preview pane or double-click the list entry to open the Gradient Editor.
Each color controller starts with a list of default gradients. These are simply a starting point for your fractal explorations. You can delete, change, or add gradients to the list to allow the color controller to access the new set of gradients. Any changes you make are saved with the fractal when you save the fractal properties and do not affect the built-in gradients or the built-in color controllers.
Adding Gradients to the List
There are several ways to add gradients to this list.
If you want to create a new gradient from scratch, click the New toolbar button to create a new gradient at the bottom of the list. Then double-click the new list entry to open the Gradient Editor to edit the gradient. When you are done editing the gradient, click Save to save your work and update the gradient in the Gradient List Control.
If you want to create a new gradient similar to one of the existing gradients, select the existing gradient and click the Copy toolbar button on the Gradient List Control to copy the selected gradient to the clipboard. Then click the Paste toolbar button on the Gradient List Control to paste the gradient found on the clipboard into the list just before the 1st selected gradient or at the end of the list if the selection is empty. Next, double-click the new list entry to open the Gradient Editor to edit the gradient. When you are done editing the gradient, click Save to save your work and update the gradient in the Gradient List Control.
If you want to create a new gradient based on the colors in an image found on your computer, click the New toolbar button to create a new gradient at the bottom of the list. Then double-click the new list entry to open the Gradient Editor to edit the gradient. On the Gradient Editor, select the Generate From Image... item on the File menu, to display the Generate Gradient From Image Dialog. Select the "..." button next to the Image property to open the Select Image dialog and navigate to an image file on your computer on which to base the new gradient, and click Open. On the Generate Gradient From Image Dialog, you can adjust the properties to control the gradient generation. Then select Apply until you like the gradient displayed in the Gradient Preview, and click Ok to return to the Gradient Editor. Click Save to save your work and update the gradient in the Gradient List Control.
If you want to copy a gradient from another color controller, navigate to the color controller and select the gradient you want to copy and click the Copy toolbar button on the Gradient List Control to copy the selected gradient to the clipboard. Then navigate back to the original color controller and click the Paste toolbar button on the Gradient List Control to paste the gradient found on the clipboard into the list just before the 1st selected gradient or at the end of the list if the selection is empty.
To add one or more of the Built-in Gradients or any gradients you previously saved in My Gradients, click the down arrow to the right of the Open Gradient Browser toolbar button to display the Open Gradient Browser menu. Select the View Built-in Gradients command or the View My Gradients command to open a Gradient Browser to view the associated list of gradients. On the Gradient Browser, select the gradients you want to add to the Gradient List Control, and select the Copy command on the Edit menu (or simply click the Copy toolbar button) to copy the selected gradients to the clipboard. Then click the Paste toolbar button on the Gradient List Control to paste the gradients found on the clipboard into the list just before the 1st selected gradient or at the end of the list if the selection is empty.
To add gradients found in a gradient file saved on your computer, click the down arrow to the right of the Open Gradient Browser toolbar button to display the Open Gradient Browser menu. Select the Open Gradient File command to display the Open Gradient File dialog to select the gradient file saved on your computer. The gradient file can be an xml file that you previously created using the Export command on the File menu of the Gradient Browser, or a .ugr file created using another fractal program like Apophysis or Ultra Fractal. Once you select the file, a Gradient Browser opens to view the list of gradients, and you can copy/paste the files into the list as before.
The internet contains a large number of gradients that you can download and use in your explorations. The deviantART group Fractal Resources, for example, has a lot of gradient collections that you can download at Gradient Packs. In most cases you will need to download a .zip file and extract the .ugr file that contains the set of gradients you can load into the Fractal Science Kit as described above.
Toolbar
![]()
All operations are performed using the toolbar buttons above the list. Place the mouse pointer over each button to see the associated command. The commands (in order) are:
-
New adds a new gradient to the bottom of the list.
-
Rename... displays the Rename dialog to rename the selected gradient. If the selection is empty or contains more than 1 gradient, the command is disabled.
-
Cut deletes the selected gradients from the list and places them on the clipboard.
-
Copy copies the selected gradients to the clipboard.
-
Paste pastes the gradients found on the clipboard into the list just before the 1st selected gradient or at the end of the list if the selection is empty. When you paste a gradient into the list, a copy of the gradient is made so that any changes to the gradient will not affect the original.
-
Delete deletes the selected gradients from the list.
-
Move Selection Up moves the selected gradients up in the list of gradients.
-
Move Selection Down moves the selected gradients down in the list of gradients.
-
Undo is used to undo the last change to the gradient list.
-
Redo is used to redo a change you previously undid!
-
Open Gradient Browser opens the Gradient Browser so you can copy/paste existing gradients from the Built-in Gradients, My Gradients, or a set of gradients found in a gradient file, into the list. Click the down arrow to the right of the icon to display the Open Gradient Browser menu. The menu has 3 items: View Built-in Gradients, View My Gradients, and Open Gradient File. These commands allow you to copy/paste gradients from the list of Built-in Gradients, the list of your saved gradients in My Gradients, or gradients created using another fractal program like Apophysis or Ultra Fractal that you have stored on your computer (i.e., .ugr files).
-
Open Documentation opens the documentation in your browser to this page!